* Relavant course book pages: 1 - 37.
The interface of Processing itself is fairly spartan, it consists of the editor (right window in image above), and the display - only visible when your program, or 'sketch,' is run. The vast majority of you time in processing will be spent in the Editor window. This window consists of 3 main elements:
1. Toolbar: contains buttons to run, stop and save your program, as well as buttons to add tabs to your project.
2. Text editor: where the digits are input.
3. Text Area: In the extremely unlikely event you make an error in your program (syntax, or otherwise), Processing will tell you all about it in this window. This window is also useful for tracking what your program is doing at any given time.
The Language:
It takes very little to create a working sketch in Processing. Sketches run in range from simple exercises executed from a few lines of code, to complex, sprawling pieces consisting of 1000's of lines of code. In either case there are some basics that must be present in order for any sketch to function properly; they are:
Simply put, functions are an enclosed set of commands that are run at one time, and are the heart of most programming languages. Functions allow you to write a command once, and execute it as many times as you wish without have to re-write the code. For instance, if you wanted to draw 50 boxes on the screen in different positions, you could write 50 lines of code: each line drawing an individual box, or you could write one function (say: drawBox()) and run that function 50 times (or 1000 times, for that matter).
In all processing sketches, you will have to have at least one function: that being the setup() function. The setup function will contain several other functions to define the look and type of sketch we are creating.
setup()
Processing's setup function is where the basics of your program are defined. Here, many things can be defined, but the key elements are:
• size: The size() function defines the size in pixels of our sketch. The size() function also determines what type of sketch we are making. Sketches can be 2-dimensional, 3-dimensional, or specially setup for print output.
So, if we wanted to make a project that was 1280 pixels wide, and 1024 pixels tall, we would write:
size(1280,1024); - notice that the size() function has two comma separated elements in the parenthesis; these are the parameters of the function. Some functions will have many parameters, and some will have none. In this case, the parameters set the width and height of the size function. As you begin with processing, you will notice that some functions may allow you to send them more parameters sometimes, and less parameters others. for instance:
• background(); The background() function sets the background color of your sketch. This can be set with one to three parameters, i.e:
background(0); - with one parameter, all three colors (R G B) are set to the same thing, in this case 0 (black)
background(255,0,0); - here 3 parameters are assigned, that means each of the 3 colors are set individually, in this case, red is 255 (full intensity), and green and blue are set to 0. This would create a sketch with a bright red background.
So: if we wanted to create a sketch that will display objects in 2-dimensions that is 800 x 600 and has a background color of yellow, we would create our setup like this:
void setup()
{
size(800,600);
background(255,255,0);
}
Notice that the size(); and background(); functions occur within the setup() function because they are encapsulated by the brackets { }. Anything contained within those brackets will be executed when the setup(); function is called.
draw()
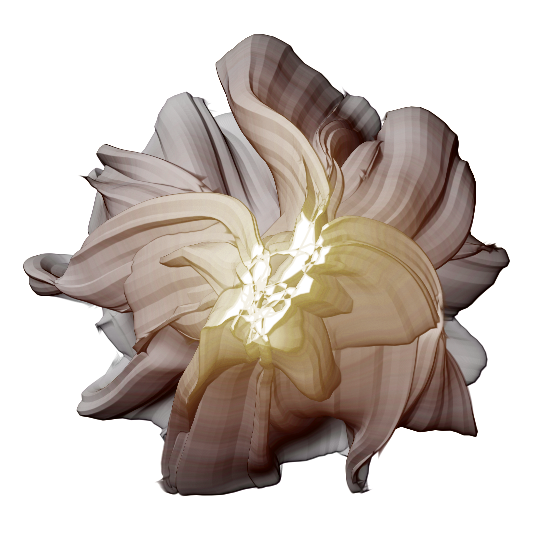
Most processing sketches will have the draw() function. This is what sends our information to the screen to be visualized. By default, processing executes the draw() function repeatedly at a default rate of 60 frames per second. When draw() is called, anything that is contained in it will be executed and sent to the screen. For instance, if we wanted to draw a rectangle on the screen we would do this:
void draw()
{
rect(100,100,400,400);
}
This would cause a rectangle to be drawn on the screen, whose upper-left corner is at 100px from the left, and 100 px from the top and whose lower right corner is 400 px from the left, and 400px from the top (see p. 25 in course book for discussion on the coordinate system).
So: to write a working sketch that displays a box on the screen, we need to put these elements together in a sketch as follows:
void setup()
{
size(800,600);
background(255,255,0);
}
void draw()
{
rect(100,100,400,400);
}
Not the most interesting sketch of all time, but it's a start.
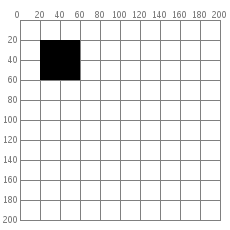
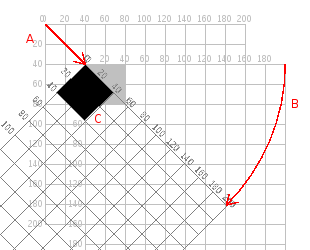
The Matrix and Translations:
Specifying coordinates for our on-screen objects is okay in some cases, but it is not alwasy the proper way to go about positioning objects on our canvas. For instance, specifying coordinates for a rectangle aligned on the horizontal or vertical access is easy, but how would you go about specifying the coordinates for a rectangle which has been rotated 28 degrees?
Rather than spending the time attempting to figure out where each corner of a 100 x 100 rectangle would be were it rotated 28 degrees, it is far easier to leverage processing's ability to manipulate the coordinate system to put the object in the desired position at the desired rotation. This involves the commands pushMatrix() & popMatrix(). These two functions allow us to move our coordinate system about the screen, thus allowing us to position objects accurately and quickly. While the coordinates in processing put 0,0 in the upper-left corner by default, pushMatrix() and popMatrix() allow us to move that (0,0) origin position to anywhere we wish to place them. So, if we want a rectangle to be placed at 150,200 on our stange, and then to be rotated 30 degrees, we can do the following:
void setup()
{
size(800,800);
background(0);
}
void draw()
{
background(0);
fill(255);
rectMode(CENTER);
pushMatrix();
translate(150,200);
rotate(radians(30));
rect(0,0,100,100);
popMatrix();
}
Drawing about zero:
Notice that the code above uses the function rectMode(CENTER). This tells processing to draw a rectangle centered on the first 2 arguments (0,0) with a width and height of the 3rd and 4th arguments (100,100). By pushing the origin of the coordinate system (translation matrix) to a new position on screen, and then drawing and rotating, we are given much more control over placement of objects on screen.
For a detailed description of the ins and outs, and pros and cons of pushMatrix(), go here: http://processing.org/learning/transform2d/
For a more thorough discussion of the drawing functions and options refer to pp. 23-26 in the Processing book.
